In this article, I will explain my approach to building a camera class that manages panning and zooming in a 2d game canvas.
We look at the underlying mathematical theory, create formulas, and then apply it to code. I will then show you the practical execution of the code in a real game.
On the surface of just looking at it, it seems like a no-brainer. In 3D it is fairly straightforward. But how do you replicate that effect in a 2d plane? This is interesting because, in theory, we are looking at the 3d world through a 2d frame.
Let's dig into it then.
Panning
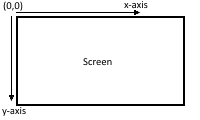
We start with a 2d plane that starts at point (0,0) for the x and y coordinates. This is usually at the top left of the canvas/screen. For this discussion, we will use an infinite canvas with the origin at (0,0). The positive x-axis moves from left to right. At the same time, the positive y-axis moves from top to bottom. This is different from normal maths where the positive y-axis is from bottom to top.
When we pan the screen, we change the position where objects are rendered, like when you scroll through social media. Therefore, if we scroll vertically moving a point from the bottom to the top of the canvas, we need to subtract from the initial y-axis position. Likewise, to move it down, we need to add to the initial y-axis position. The same thing applies if we want to move the point across the x-axis. To move a point to the right, we add to the x-axis and to move a point to the left, we subtract from the x-axis
By using this idea, we can set up a camera class that has a position (x,y) property relative to which we will render our points.
This means that if the camera is at (0,0) and a point is at (1,1). When we render the point on the screen, it will be at (1,1).
If we move the camera to (1,1), and the position of the point remains the same at (1,1), we render it at a new position on the canvas relative to the value that we have set for the camera which should be (0,0). This means that the point is now at the origin of the canvas. If we move the camera to (2,2), and the point has a fixed position at (1,1), the point will no longer be visible on the screen, because it will be at (-1,-1).
Using the above, we can deduce a formula for panning a point on the canvas
render(x,y) = point(x,y) - camera(x,y)
Therefore, by specifying the x and y positions of the camera, we can determine the coordinate on the canvas where the point would be rendered.
Zooming
In 3d when we zoom into something, we bring it closer to our eye which makes it bigger and we can see more detail. This effect can also be achieved on a 2d plane, but to develop a mathematical model of zooming, we need to go down to one dimension.
In a one-dimensional line, let's take the x-axis, the starting point is zero (0) and we can move positively to the right as well as negatively to the left. Let's move positively to a random point, say positive 50.
We want to look at the range from 40 to 60. This means that 50 is in the middle. Because (40+60)/2 = 50.
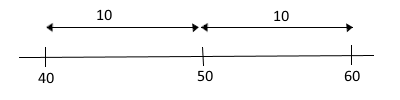
Now, let's take a look at what happens when we zoom in. If you remember what I said earlier, when we zoom in, we see more detail. Therefore we note the distance from 40 to 50 is 10. And the distance from 50 to 60 is 10. If we render this on the canvas, it would be exactly as we have described without zoom.
Zooming in is like stretching a rubber band out from both ends by the same amount.
When we zoom in, render those points on the screen, and measure their distances we will notice that they are further apart from the implied anchor which is 50. Therefore after zooming in, if we take our ruler and measure the distance from 40 to 50 and 50 to 60 on the canvas, it will be greater than 10. The amount with which it has increased is called the zoom factor.
For example, let's say, we have a zoom factor of 1.5 and render it on the screen. This means that we stretch the line out. What will be the final coordinates and distance from 50? If 40 and 60 were the initial coordinates each with a distance of 10 to the point 50.
This is easy to calculate and requires 3 steps
- Find the distance from the origin(50)
- Multiply the distance to the zoom factor to get the new distance
- Add the new distance to the origin(50) to get the new coordinates
Let's do this for the end at point 40 applying a zoom factor of 1.5 which is the final rendered point on the canvas.
Step 1. 40 - 50 = -10
Step 2. -10 × 1.5 = -15
Step 3. -15 + 50 = 35
For point 40, this means that the new final coordinate after zoom is applied is 35.
For point 60 also applying a zoom factor of 1.5 what is the final rendered point on the canvas?
Step 1. 60 - 50 = 10
Step 2. 10 × 1.5 = 15
Step 3. 15 + 50 = 65
For point 60, this means that the new final coordinate after zoom is applied is 65.
Therefore before Zoom, the 3 important points that we are looking at are 40,50,60. After a zoom factor of 1.5 is applied, does points are scaled to 35,50,65. This is all done in 1 dimension.
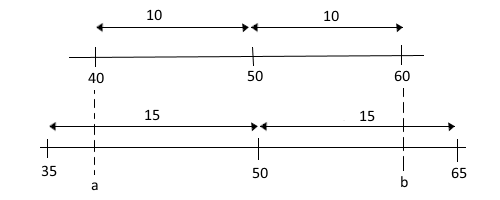
Point 50 is called the focus because as you see it remains constant as it is the point from which others are scaled.
Let's develop a formula using the above that we will use just like we did for panning.
Let's say that
xb is the coordinate of the point before Zoom,
xa is the coordinate of the point after Zoom,
xf is the focus point, and
z is the Zoom factor
Compressing the 3 steps above into one expression, we have the following
xa = (xb - xf)z + xf
Solving the above, you get
xa = zxb - zxf + xf
xa = zxb - xf(z-1)
zxb = xa + xf(z-1)
xb = (xa + xf(z-1)) / z
There you have it.
The final coordinate of a point after zoom is applied is given by the following formula
xa = zxb - xf(z-1)
Applying this to 2-dimensional coordinates requires you to perform this calculation on each coordinate for (x,y).
Applying this to the camera class, we store a zoom variable for the zoom factor and, use the x and y coordinates of the camera as the focus and apply a zoom (i.e calculate the final x and y positions) on all points relative to the focus.
render(x,y) = applyZoom(point(x,y), camera(x,y))
where applyZoom has the following function definition
applyZoom(point, focus)
Note that to pan and zoom, pass in the new pan position to the applyZoom function to get the new pan+zoom position for rendering. Pan first, zoom second.
The camera class
Here is the complete camera class in JavaScript, I have stripped it down to show only what is needed to implement panning and zooming, use it as a basis for your implementation, and don't forget to credit me for helping you out.
class GameCamera {
    constructor(gameState) {
        this.gameState = gameState;
        this.isFocusOnGameObject = false;
        this.focusedGameObject = undefined;
        this.cameraWidth = game.canvas.width;
        this.cameraHeight = game.canvas.height;
        this.position = new Vector2D(0, 0);
        this.direction = new Vector2D(0, 0);
        this.target = new Vector2D(0, 0);
        this.point = new Vector2D(0, 0);
        this.offsetX = 0;
        this.offsetY = 0;
        this.duration = 0;
        this.elapsedTime = 0;
        this.callback = undefined;
        this.minDistance = 1;
        this.zoomLevel = 1;
    }

    // Method to specify a location in world space where camera should focus
    setFocus(x, y, offsetX = 0, offsetY = 0, translateAnimationDuration = 0, animationCompleteCallback = undefined) {
        this.isFocusOnGameObject = false;
        this.point.set(x, y);
        this.target.set(this.point.x - (this.cameraWidth / 2) - offsetX, this.point.y - (this.cameraHeight / 2) - offsetY);
        this.offsetX = offsetX;
        this.offsetY = offsetY;
        this.duration = translateAnimationDuration;
        this.callback = animationCompleteCallback;
    }

    // Method to attach a target that the camera will follow
    setTarget(gameObject, offsetX = 0, offsetY = 0, translateAnimationDuration = 0, animationCompleteCallback = undefined) {
        this.isFocusOnGameObject = true;
        this.point.set(gameObject.property.position.x + (gameObject.property.size.width / 2), gameObject.property.position.y + (gameObject.property.size.height / 2));
        this.target.set(this.point.x - (this.cameraWidth / 2) - offsetX, this.point.y - (this.cameraHeight / 2) - offsetY);
        this.focusedGameObject = gameObject;
        this.offsetX = offsetX;
        this.offsetY = offsetY;
        this.duration = translateAnimationDuration;
        this.callback = animationCompleteCallback;
    }

    update(deltaLoopTimeInMilliseconds) {

        // because the object might move (change its x,y position), we update the point and target each frame
        if (this.isFocusOnGameObject) {
            // set the point to the middle of the object
            this.point.set(this.focusedGameObject.property.position.x + (this.focusedGameObject.property.size.width / 2), this.focusedGameObject.property.position.y + (this.focusedGameObject.property.size.height / 2));
            // move the camera target to position the point at the center of the camera boundary +- offset
            this.target.set(this.point.x - (this.cameraWidth / 2) - this.offsetX, this.point.y - (this.cameraHeight / 2) - this.offsetY);
        }

        // check if the camera has focused on the target else transition smoothly to the target
        if (this.position.distance(this.target) < this.minDistance) {
            this.elapsedTime = 0;
            this.setPosition(this.target.x, this.target.y);
            if (this.callback != undefined) {
                this.callback();
                this.callback = undefined;
            }
        } else {
            if (this.duration == 0) {
                this.setPosition(this.target.x, this.target.y);
            } else {
                this.elapsedTime += deltaLoopTimeInMilliseconds;
                if (this.elapsedTime > this.duration) this.elapsedTime = this.duration;
                let ratio = this.elapsedTime / this.duration;
                this.direction.set(this.target.x, this.target.y);
                this.direction.subtract(this.position);
                this.direction.multiply(ratio);
                this.position.add(this.direction);
                this.setPosition(this.position.x, this.position.y);
            }
        }
    }

    // Method to set the camera's position
    setPosition(x, y) {
        this.position.x = Math.max(0, Math.min(x, (this.gameState.worldWidth - this.cameraWidth)));
        this.position.y = Math.max(0, Math.min(y, (this.gameState.worldHeight - this.cameraHeight)));
    }

    render(textureId, x, y, width, height, sourceWidth, sourceHeight, row, frame) {

        let objectX = ((x - this.point.x)  this.zoomLevel) + this.point.x - this.position.x;
        let objectY = ((y - this.point.y)  this.zoomLevel) + this.point.y - this.position.y;

        // if object is in the frame of the camera, render it.
        if (
            objectX < this.cameraWidth &&
            objectX + width > 0 &&
            objectY < this.cameraHeight &&
            objectY + height > 0
        ) {
            textureManager.drawCameraFrame(
                textureId,
                objectX,
                objectY,
                width,
                height,
                sourceWidth,
                sourceHeight,
                row,
                frame,
                this.zoomLevel,
                game.ctx
            );
        }
    }
}
Practical example
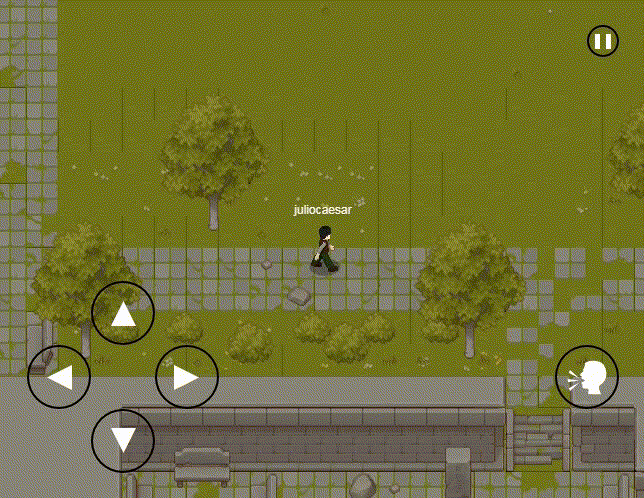
If you have done everything as described in this article, you will have created your camera class using pure JavaScript without any frameworks. Here is an example of it in action

This gif is from ShareTXT virtual which is a free real open-world, massive online multiplayer experience, where you can interact with other players and engage in fun activities together.
The graphic assets for the illustrations used in this article are listed below
I hope this article has helped you to understand the theory of how panning and zooming work in a 2d plane or game. I have given you the formulas, as well as how to represent them in code for execution in your programming language of choice. I have also shown you the practical result that should be expected if you do everything as expected. Have a nice day.